31 October 2010

... and Arial and a couple of bats.


We just returned from a lovely (and I mean lovely - the weather was just perfect) evening of trick-or-treating.

One thing I love about this evening every year (and because we live on the far East side of our time zone) is that there's only really about a half an hour or so of good lighting before the sun gets too low to catch good photographs without a flash. (I'm allergic to flashes. Or, I at least avoid them like the plague if at all possible.) This is great because it means that after snapping some fun shots of the Halloween fun early in the evening, I have no choice but to tuck my camera away and be completely present. I love being totally present with my family!

This year we had big plans to make Charlie & Lola costumes for Oliver and Hazel, complete with butterfly barrettes and a baseball tee. But, way turned into way - I came across these great costumes at yard sales last month for $1 and $.50 and I also got just a little lazy. Last year I made a fantastic homemade costume for Oliver. This year he was thrilled to be a store-bought (yard sale) spider. I'm at peace.

Photobucket

And by the look of this little peacock, I'm thinking she was also at peace.

Photobucket

Her plume spread was so big we couldn't see to walk around with her, so she actually spent most of the time in her stroller. Isn't she so nice and snuggly?

Photobucket

Bea was a post-mer-transformation-Ariel. This girl loves to dress up, so Halloween was just her speed this year!

Photobucket

Really, this was the first year they both finally got the hang of the whole trick-or-treat process. Last year we spent so much time and effort helping them figure out what was going on and what they were supposed to do. This year, they were old pros.

Photobucket

We are always quite a sight on walks with our double and quad strollers. Also, Hazel looks funny in the stroller in her costume. Also also, see my cute pregnant sister?! I love her.

Photobucket

Here's our guy showing the full eight-leg costume feature. He greeted just about every house he went to with "I'm a spaeder!"

Photobucket

Oh, and speaking of excellent yard sale purchases - how about these bat costumes for Moses and Augustine? Four dollars. Awesome. (What you can't see is is that they had wings that strapped onto their arms so they could flap with delight. They were great!)

Photobucket

Two girls I love. (Yes, I am chocking this post full of pictures. This blog is our family's journal. It's my prerogative.)

Photobucket

To our great delight, there were several houses in the neighborhood that served more than candy for the kids. Once house served chili and beef stew, another one was serving big bowls of jambalaya, and there were several hot cider and hot chocolate stops along the way.
Photobucket
Also, my favorite costumes of the evening (yes, I stopped them to ask for a photo) belonged to a couple wearing hula hoops under their clothes, Hawaiian shirts and t-shirts that read: "Which Way To The Buffet?".

Also, there was a Westie dressed up as Alice in Wonderland. Of all the Alice's we saw (and there were many!), she was my pick.
Photobucket
And before the sun sets on my pictures from this evening, I have to show you my little Moses-bat who is learning to wink.
Photobucket
And that's all for tonight. Time to be present with my family.

Photobucket

And maybe a Reese's Peanut Butter Cup.

Photobucket

Happy Reformation Sunday, friends!

30 October 2010

... the best things in life
IMG_0412

are right

IMG_0405

in front of you.

29 October 2010

Photobucket

Staying warm under blankets while they wait for Daddy to finish making breakfast. (I was sleeping in - ah, the bliss! - so when I woke up, Ryan shared with me this evidence of our dear children enjoying each other on this chilly late-October morning.)


Since you asked: I made the quilt on Oliver and the blanket on Hazel is from SisterSue Designs. I won it in a giveaway and it's one of my very favorites!

25 October 2010

As you have probably gathered from my two previous posts, we managed a quick family photo shoot over the weekend. I had this big idea that we could get everyone clean and dressed and well-rested at the same time, load up Daddy's favorite chair and drive around until we found the perfect spot to shoot some pictures of the ones we love.

Not only was the idea of getting everyone simultaneously clean and dressed and happy a tall bill to fill, but I totally thought that Ryan and I could art direct the whole thing and manage the composition and shutter on our own. I called it our "tripod and a prayer" photo shoot.

We did manage to wrangle our crew (though we did accidentally forget our backpack full of snacks at home on the sofa - BIG mistake. huge.) and once we were all loaded in the car Ryan drove us around some of the prettiest parts of Franklin to find a lovely location that none of us knew existed. (Seriously, fifty points to the man who found this gorgeous location in a pinch!) I honestly thought that would be the biggest challenge of the day.

Nope.

Turns out I needed to put a little more "prayer" into my "tripod & a prayer" photo shoot.

Little people are impatient. And squirmy. Especially when you're asking them to do something that they just don't understand. Especially especially when you forget their snack and it's lunch time. Ryan and I both did a LOT of setting up a shot, sprinting to join the shot (I don't recommend using a 50mm fixed lens on a tripod for full body shots, makes for a looong run) and melting in frustration as we watched another set of five (my camera will continuously shoot 5 times on the timer setting if you ask it nicely) go down the drain.

So glad we weren't using film.

It would have been much easier to ask someone to come along and help with clickity-clacking away at the shutter, but it was something I really wanted to try on my own. I wanted to be the photographer. Turns out it's waaay harder than it looks.

1 hour and 300+ frames later, we were able to turn out a few that we really loved. Most of them came from one of us actually manning the camera instead of being in the shot, but we did manage a couple of the four of us that I will really treasure.

I thought it would be fun - since I've already shared some of my favorite shots from the day - to also share some shots of what belonged on the cutting room floor, so to speak.

We can start with one from a series of a dozen shots that were all lost because after I set up the shot, the wind blew a tall grass right in the way of Hazel's face.

IMG_9958

And here's a potentially really lovely one, except that the camera thought we'd rather see the big, brown dead foliage in perfect focus and leave the two Myers ladies blurry in the background.

IMG_9982

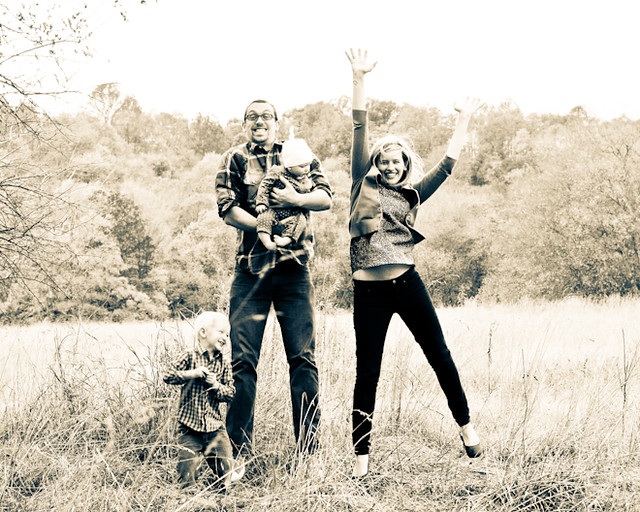
Here we attempted the increasingly popular jumping shot. On a timer. Even our best one wasn't really worth framing.

IMG_0028
IMG_0031
IMG_0031

Some pictures were good after a bit of good, old fashioned cropping. For example, all the lovely ones of me tossing and kissing baby Hazel initially looked like this:

IMG_9998

But, cropping the distracted and hungry 4-year-old out of the frame makes for a really sweet shot of Mama and her baby girl.

IMG_9998

There were also a couple of shots that weren't really the auto-shutter's fault, they just ended up being a bit funny.

Here's Oliver showing Daddy a stick he found while I give Hazel a quick nursing break in the background. Handy to have a comfy chair out there in the woods! Also handy that as long as she's near her Mama, Hazel can never forget her snack. :)

IMG_9920

And in this one I didn't even notice that Oliver was behind them playing in the grass.

IMG_0052

And Ryan's best attempts at a shot of him with the kids.

IMG_9878

IMG_9913

There's not really anything wrong with this one. I'm just showing it because it's cute.

IMG_0076

And there you have it: our "tripod and a prayer" photo session! It was hard work - harder than I expected - but I'm really pleased to have some lovely photos of my family at this fun - albeit challenging - stage of life.

IMG_9948

Happy Monday!

20 October 2010

Since it's officially been two months since we installed the new floors in the kids' room, I figured it was finally time to make good on my promise to show y'all exactly what we did and how we did it.


It all started with lovely, perfectly good berber carpet. Then a midnight bloody nose (which looked very much like a crime scene) made it not so perfectly good. That, combined with a nearly-ready-to-crawl baby, motivated us to pursue a cleaner, less allergenic (is that a word?) option for their nursery floor.

So, this is where we started:

Photobucket

I let Hazel play on Oliver's comforter while I cleared out the room.

She fell asleep. I love her.
Photobucket
Ew. See the yucky carpet? (Post crime-scene clean up, though there's still eveidence.) Understand why I didn't want my little treasure to be crawling around on carpet if we could help it?

So, I went for it. It took some cahones, but I just grabbed at one corner and pulled.

Photobucket

I felt a little guilty pulling up perfectly good padding underneath, but I was focused on my goal. After the carpet and the padding came the tedious job of pulling up all the nail strips and staples. I recommend having a buddy or music or something for this part or it can get pretty long and annoying.

Photobucket

Okay, so I forgot to photograph the room after I had it totally swept and prepped, so just imagine that picture here. We swept then vacuumed, just fyi.

Next came the fun part: actually laying the wood and seeing things come together.

Photobucket

We used 6" wide southern yellow pine purchased at Lowe's or Home Depot, I can't remember which. Ryan spent the better part of an hour in the lumber aisle hand picking each plank for straightness and uniformity. (My job was to cart the kids around the store, gathering our other supplies and finding a quiet part of the gardening section to nurse a very insistent baby. Yes, that happened. Not my favorite moment, but we pulled it off.)

Photobucket

I wish I could tell you lots of useful details about the laying of the wood, but that really was Ryan's job. He used a pretty hardcore nail gun per the suggestion of the Lowe's employee who was concerned that the boards might creak if you didn't tell them who's boss. He started at the back of the room and made his way to the front, using a chop saw to cut the boards to size.

Photobucket

We decided that we definitely wanted the wood to continue into the closet and that was a little tricky but we figured it out. There's actually a tool you can purchase for about $12 that helps you cut your door frame trim higher to fit flooring under it. Nifty.

Also, at the end a few boards needed to be ripped. We didn't have a table saw at the time (bought one at a yard sale the following weekend for $15. Blerg.), so the cuts were a little choppy - nothing a little quarter round couldn't hide.
Photobucket
Ryan was tempted to leave it unfinished. It really was pretty, but I was focused.

Besides, I've always wanted to get to roll paint onto a floor. Kinda hard to mess up.

Photobucket

I used porch and floor paint and a really low-pile roller cover. It took about 3 coats and it was honestly so much fun. At one point I lost all ability to restrain myself and just sloshed a big glop on the floor to push around. I've always wanted to do that.

Photobucket

(Note: if you want more cracks and pits to show in the end, don't slosh your paint on the floor. It fills the pits, which is just fine and maybe even desired if you want things to look nice and solid. But if you want things to have a more rustic look, no sloshing.)
Photobucket
(I think the above picture was taken after the first coat.)

Next, protect your hard work with polyurethane.

This is the part where you get to learn from our mistakes though. We naively purchased CLEAR satin polyurethane thinking it would dry, well, clear. But, when the final coat dried, there was a bit of a yellow cast in some areas. It wasn't bad - in fact, we thought maybe our eyes were playing tricks on us - but a quick Google search told us that oil based polyurethanes will have an amber cast that will get darker with time. Dang it.

So, let it be writ: buy WATER-BASED polyurethane to finish your floors. You're welcome.

Photobucket

So in conclusion, here are some of the supplies we used and what we learned about using them:
  • Latex satin porch and floor paint - rolled on with a low-pile roller
  • Satin polyurethane - use water-based!
  • We rolled the first coat of the varnish on with a foam roller and quickly learned that it wasn't the right tool. It left bubbles.
  • We sanded the first coat of varnish really thoroughly per the can's instructions and cleaned the floor well before applying a second coat - this time with a natural bristle brush.
After we got the wood laid, the rest of the steps were pretty simple. The curing time in between coats and the odor from the varnish were the hardest parts. Fortunately, we managed to keep everyone out of the house most of the time.

Photobucket

So, 1 weekend, 40 planks of southern yellow pine and a couple of good sloshes of paint on the floor later, we upgraded the kids' room from this:

Photobucket

to this:

Photobucket

I'm sure I didn't cover everything, so if you have any questions feel free to ask in the comments. I'll be answering questions right here in the post. Hopefully that will be helpful.

And, there you have it. I can't tell you how happy we are with our new floors. It's unbelievable to me how much more I want to be in that room. We play in there so much more now! Upgrade.

Answering questions from the comments:

Cost: Each 1x6x8 board ran between $9-$10 for us. You do the math with your own square footage. Other than that, you will need a gallon of paint, a gallon of varnish (both of which can be used to do SEVERAL rooms), brushes, quarter round (if you choose to use it) and a new register cover in our case. All said, for the kids' room (I think it's about 11'x12' or so) we spent $400 give or take. (It will be more if you need to buy or rent a nail gun and air compressor.) We plan to tackle the bonus room next which is well more than double the size so we're saving up. Definitely worth it if you can swing it!

How smooth is it to walk on? It really is just like any other wood floor. I would say that there are probably places where it's a little higher or lower than others, but we never notice it.

Does it scratch easily? So far, so good! That was part of why we put down two good coats of polyurethane. That way, if something scratches, it's the finish and not the paint. We did have one yellow wooden toy that Oliver stepped then slid on that left a little yellow mark. It didn't scratch the finish, just left a scuff mark of it's own.

How about showing dirt? How are you cleaning it? I just broom sweep it regularly and I've been using diluted lysol liquid floor cleaner less regularly than I should be. :) I'm hoping to find room in the budget soon for one of those Shark steam mops. I hear they actually sanitize your floors!