There are some things you will make in your life that are very personal. Some things that are as unique as you are - things that you will use often enough that you'd like them to reflect your personal taste and style.
Camera strap covers have become one of those things.
I don't say this to put undue pressure on you when you set out to choose your fabrics and finishes. I say this to explain how and why I've decided to write the tutorial the way I have. Every camera strap cover should be unique - so I am giving you a two-part tutorial to show you not only how to make one, but how to make it yours.
Camera Strap Tutorial, Part 1:
Universal fit, gathered and knit ruffle,
and lens cap pocket
The camera strap cover I'm making today will have a gathered ruffle on it. I'm using knit (interlock) material for that so that I don't have to finish the edges. I chose a quilting weight cotton (Stone Ta Dot found here) for the body of the strap and I grabbled a size 4X t-shirt in the plus size clearance department of Wal-Mart for the ruffle for a couple of dollars. Big score!
I will teach you how to make a custom-fit strap tomorrow, but for today, we're making a universal fit that is great for gifts (or yourself) because it will fit virtually any camera strap cover with no problem.
Cut:
6" x 30" piece of your body fabric
Two strips of your knit ruffle fabric: 1.75" x 60" & 2.5" x 60"
{the length of your knit strips can really be give or take. I figured a 1:2 ratio with the body fabric for good fullness in the ruffle.}
You'll likely have to piece together your pieces of knit fabric to get the 60" length (if you're cutting it from the bolt you may be able tog get that length all in one cut). Simply align your strips at at 90 degree angle, stitch from corner to corner, snip the excess material, then straighten them out and press the seams.
There. Now you have your materials.
Now, draw a line 1 3/4" from one side of your body fabric. It's ideal to use an air soluble pen for this, but since your mark will be hidden by your ruffle, it's not super necessary.
Still, I'm a purist on this one.
This is what your mark should look like.
Now we're going to gather the ruffle. {Tomorrow I'm going to teach you how to use a ruffler foot [swoon!] to get cool, even ruffles stitched to your body all in one step. Today, the gather.}
You may remember how to gather strips of fabric from my ruffled neckline tutorial, but just in case you don't I'll give you the rundown.
Set your stitch length to a 5. Nice, long stitches are easier to gather.
Now, lay your narrower strip on top of your wider strip and (using a coordinating top thread and white bobbin thread) send them through the machine together, taking care to keep your stitch right on center. (Mmmm... still loving my new Brother!) When you're finished, the top of your strip should look like this.
Now, grasping your knit strip loosely in your left hand, grab the white bobbin thread in your right hand. Slide the knit fabric gently down the bobbin thread. It will gather as you pull.
Take care to gather your fabric evenly along your bobbin thread. You'll be finished when your fabric is gathered evenly and your knit strip is the same length as your body fabric (30").
Lens Cap Pocket (optional)
Now I'm going to give you an option. Some of y'all have requested that I show you how to make a lens cap pocket for the camera strap cover. If you don't want a pocket, you can skip smoothing the gather and attaching the pocket. If you do want a lens cap pocket, pay close attention:
At one end of your knit strip, pull your gathers out starting at about 3" from the end of the body fabric. (Your pocket will wrap around this area, so it will help to smooth the gathers to prevent bulk and bunching.)
Now take a peek under your strip and do your best to align your white bobbin thread with the mark you made on your body fabric (1.75" from the edge).
Pin the ruffle in place in several spots.
Now adjust your stitch length to 3. We're going to attach your ruffle to your main fabric.
Go as slowly as you need to here, taking care to stitch right on top of the previous stitch line.
Feel free to double check as many times as you like to be sure that your stitching it right onto the line you drew on the body fabric.
Now it's attached!
And now you feel great!
Alright, back to the optional pocket:
Cut a piece of coordinating fabric (or the same fabric you used for the body, if you like) 6" x 3 1/2".
Press the top edge down 1/2" and stitch in place. {I stitched two lines because I think it makes things look more finished.}
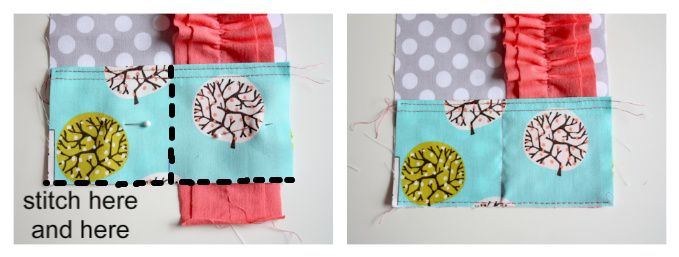
Now align the pocket fabric with the bottom edge of your body fabric {on the end where you pulled out the gather, of course}.
Make a mark down the center of the pocket and stitch down the center and across the bottom (about 1/8" from the edge, just to hold it in place).
Be sure to backstitch at the top of the pocket for strength.
Turn both ends of the body fabric under 1/2" and press. We're just hemming the edges.
Stitch at least one line to hold your hem in place. (Again, I like the look of 2 or 3 lines. It's up to you.)
Almost finished!
Now fold the cover in half lengthwise, right sides together.
Using a 1/2" seam allowance and backstitching thoroughly at the beginning and end, stitch the strap cover closed.
{Important note: You really do need to use a 1/2" seam allowance so that the ruffle and pocket will be centered on your finished piece. If you're nervous about the ruffle catching in your stitches, just push it out of the way as you go.}
When you're finished stitching, your strap will look like this. It's a good idea to secure the raw edges by serging them. If you don't have a serger, you can use a zigzag stitch.
Now turn your creation right side out. I use a small dowel rod for most of my inverting needs.
When you've turned it right side out and it looks all rumply and sad, don't panic! It just needs a little iron love and it will feel much better.
Just lift the ruffle out of the way and press the long stitched side first, then the other side. There's no need to press the ruffle itself.
Presto! You're creation is now a masterpiece! It reflects your style and your personality and it only took a sneeze of fabric!
Are you excited to get it on your strap and attached to your camera??
I did realize after the fact that really the only way to photograph the strap on the camera was to involve myself in the photo. (That or set the camera on a timer in front of the bathroom mirror and run out of the room. Too much trouble - believe me!)
So, here I am with my happy new strappy!
I'm adding this creation to my Flickr pool! Join me?
Alright friends, come back tomorrow for Part 2 of the camera strap cover delight! There will be a video and it will make you glad!
Disclosure of Material Connection: I received the Brother NX800 machine mentioned above for free in exchange for a mention of the product in my blog. Regardless, I only recommend products or services I use personally and believe will be good for my readers.


9 comments:
I'm definitely bookmarking this to try! Can't wait for Part 2. Have you ever attempted to make a fun and pretty pouch for an IPad? I want to make one for my husband for his birthday. Also, you should do a post on how you organize your fabrics and supplies in your sewing area. My sewing stuff is a disaster and I need some inspiration!! :)
Any chance of you making and selling these in your Etsy store?? I would totally love to buy one. Or is it possible to request a custom order for one? Thanks.
You don't want to know how many times I had to read through this tutorial to realize just HOW the cover fit on/over the strap. It's design is so simple that its genius is not immediately recognizable. I was expecting, like, hooks or sometehing. I dunno, like a bra? A camera strap bra?
I love your suggestion of a plus size shirt for the knit ruffle. I'm always on the lookout for funky-colored stretch t-shirts at garage sales and thrift stores, and you're right, it's the best and cheapest way to do it. Who knew my camera could be so fabulous! Once I make one, people will take me seriously as a photographer. Won't they be surprised.
mingstly!
ps: Can't wait for the ruffler foot video! Haven't gotten mine out yet after the renovation. A little afraid of it. I think it might chomp on my arm or something.
where did the tree come from? that's all i can think beyond your adorability and awesomeness!
I'm going to have to make one this weekend! Love your choice of fabrics and the t-shirt idea is perfect! Thanks! :)
LOVE! the pink ruffle has my heart.
Keight- the tree fabric is here!
http://www.etsy.com/listing/70740006/cloud9-nature-walk-organic-grove-in-sky?ga_search_query=organic&ga_search_type=user_shop_ttt_id_5630277
this is so cute! i wish you would sell these is your etsy store! im only 18 and not very sewing savvy, but would love one for my camera!
I can't wait to make one!
Post a Comment